Configuring the WYSIWYG Editor
This page provides reference information for configuring the WYSIWYG editor used in all page content areas and components.
Important Note: You will want to keep in mind when configuring the editor profile in use now is that you would want to make this the profile that includes only editing features that all users would be able to use (even non-admins) to make sure that all users will be able to edit content, especially after the site launches. So, you probably wouldn't want to include features in this editor profile that only admin users would use.
For Example:
There are two editor profiles, Profile A and Profile B. Profile A is the "advanced" editor with more formatting options and Profile B is the "simple" editor with fewer formatting options. Administrator users have access to both profiles but Content Author users (non-admins) have access to only Profile B.
If Profile A is used as the editor for the "Body" area of a page, Content Author users won't be able to edit the content since it is using a WYSIWYG editor profile that these users don't have access to.
Also, if the editor for this page is switched from Profile A (the "advanced" editor) to Profile B (the "simple") editor so that Content Author users can edit the content, any formatting applied using options that Profile B doesn't support would be removed.
These are the reasons why you would want the editor currently in use to be the editor profile that all CMS users would have access to, so that all CMS users would be able to edit WYSIWYG editor content.
If additional editor profiles are created, Administrator users would have the ability to change which editor is used when editing a page or component, so pages and components that only Administrator users would edit could use an editor with more formatting options.
WYSIWYG Profiles
The CMS supports multiple instances of the WYSIWYG editor. Each instance can include its own set of formatting options and access to the instances can be limited based on CMS roles.
Where the WYSIWYG editor profiles are managed in the CMS
The CMS refers to the WYSIWYG editor as the "Text Editor". The administration screen for the WYSIWYG editor is on the Text Formats and Editors configuration screen.
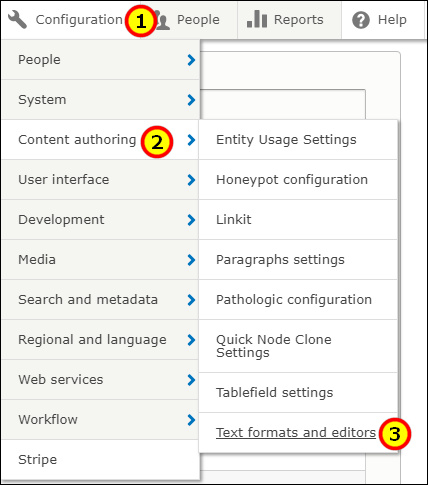
This screen also can be accessed through the CMS menu by mousing over Configuration, then mousing over Content authoring, and then clicking on Text formats and editors.
This screen lists the WYSIWYG editor profiles in use within the CMS.
Which profile is used for the LRU site
The profile used for the WYSIWYG editor is the Full Text profile. This is the profile that is used in all page content areas (the Body field in the Copy area) and in all components (Accordion component, WYSIWYG component, etc.).
Changes made to this profile will be applied to all page content areas and components.
Opening Full Text the profile for configuration
On the Text Formats and Editors screen, click the Configure button on the Full Text line item. This opens the configuration screen for the profile.

Profile configuration options
Below are the available options for configuring the WYSIWYG editor.
Name
This is the name that identifies the WYSIWYG editor throughout the CMS. If multiple editor profiles are used, the name is used to select when editor to use in a particular page content area of component.
Roles
This area sets the CMS user roles that are able to use the editor when editing pages and components. Checking the check box next to the name of a role grants that role the ability to use the editor.
This area does not grant access to this configuration screen.
Text Editor
This specifies the interface used for the WYSIWYG editor. The CKEditor option needs to remain selected. This is the only option.
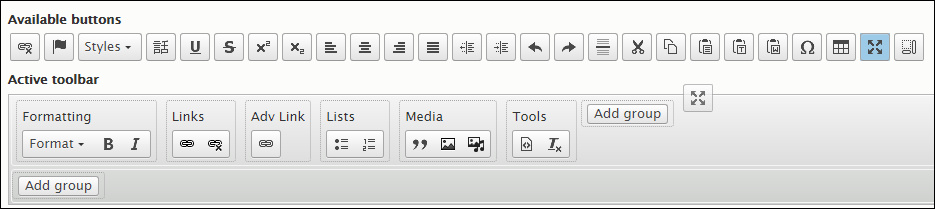
Toolbar Configuration
This area sets which formatting options are available in the WYSIWYG editor toolbar and how the options are organized.
There are two sets of buttons in this area.
Available buttons - These are the formatting options that are available to be added to the editor.
Active toolbar - These are the options that currently are present and available in the editor toolbar.
Button divider - This adds a vertical dividing bar to the editor toolbar. This is used to provide a visual separator between individual option buttons in the editor toolbar.

Adding a formatting button to an existing group in the WYSIWYG Editor toolbar
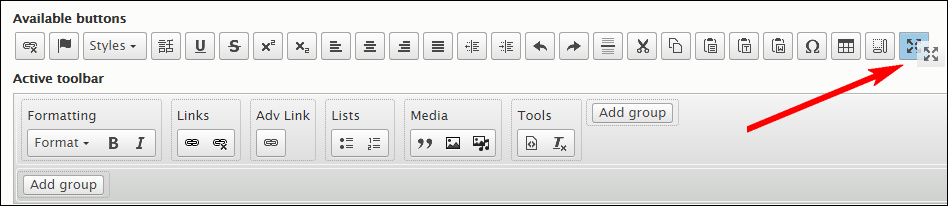
To add a formatting button to the WYSIWYG editor toolbar, in the group of buttons under Available buttons click and hold a button icon and drag it to the buttons under Active toolbar.
When button reaches the Active toolbar, the names of the button groups appear above the buttons.
To add the button to an existing group, click on and drag the button from the Available buttons under a group name in Active toolbar and position it within the buttons within the group.
Release the mouse button to complete the placement of the new formatting button in the editor toolbar.

Adding a formatting button to an existing group in the WYSIWYG Editor toolbar
To add a formatting button to the editor and to place it in a new group, the group is added first and then the formatting buttons are added under it.
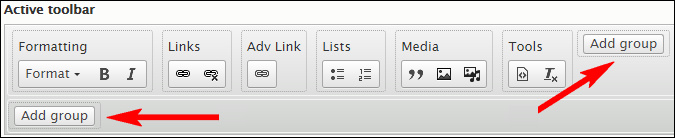
To reveal the buttons for adding a new group, click the Show group names link to the right of the Active toolbar.
Click the Add group button above or below the Active toolbar. To add the new group below the existing row of formatting buttons, click the Add group button below the existing buttons. To add the new group on the same row as the existing buttons, click the Add group button to the right of the existing buttons.
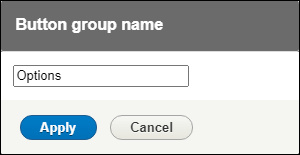
In the dialog that opens, enter the name for the group and then click the Apply button.
The new group is added to the editor toolbar.

Use the procedure under Adding a formatting button to an existing group in the WYSIWYG Editor toolbar to add formatting buttons under the new group.
Moving groups in the editor toolbar
To change the left-to-right ordering of the groups in the editor toolbar, mouse over the group name so that cursor turns into a four-pointed arrow. Then click and drag the group to the desired location in the toolbar.

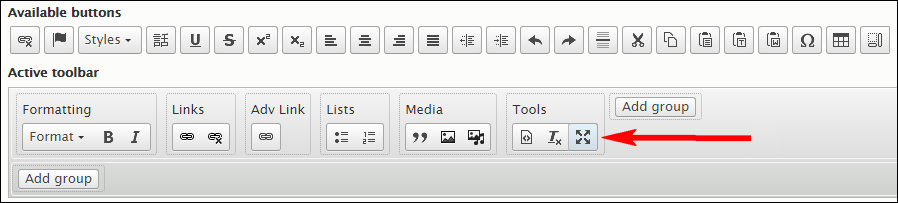
Removing a button from the editor toolbar
To remove a formatting button from the editor toolbar, click on the button under Active toolbar and drag it under Available buttons.
Adding a divider between buttons in the editor toolbar
Click on the vertical bar under Button divider and drag it between two formatting buttons in the Active toolbar. A vertical line appears between the buttons indicating that there is a divider between them.

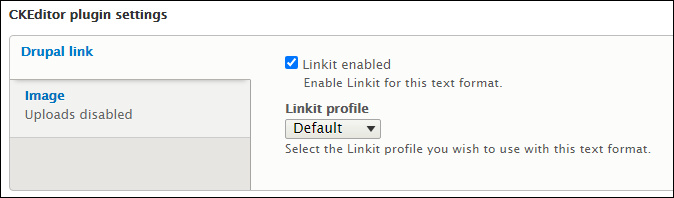
CKEditor plugin settings
This area controls the settings for plugins used with the WYSIWYG editor.
Drupal Link - This enables the add link dialog to use a selector field to search for a page to link to by name. This should remain enabled and the settings kept as they are.
Image - This enables images to be uploaded into the CMS while working in the WYSIWYG editor. This should not be enabled as it will not place uploaded files into the same directories ad files uploaded through the Media Manager, so this could lead to problems maintaining the files.
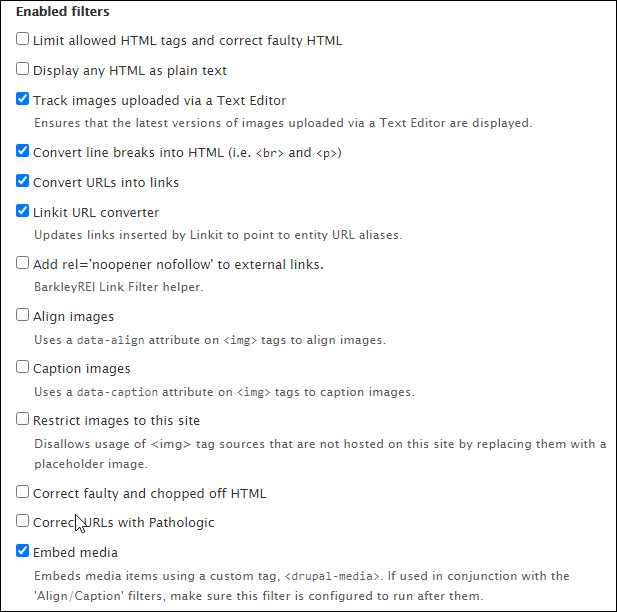
Enabled Filters
This area sets which filters and actions are applied to content entered into the WYSIWYG editor. Checking the check box next to a filter or action activates it. Unchecking the check box de-activates it.
Note that some filters and actions have specific settings associated with them. For example, the Limit allowed HTML tags and correct faulty HTML filter includes a field for specifying what HTML markup tags to retain when a page is saved (any tags not specified are removed). Any settings associated with an action or filter are in the Filter Options area at the bottom of the editor configuration screen.
Filter Processing Order
This area controls the order in which the filters selected the Enabled Filters area are processed and applied. The ordering runs from top (first filter/action applied) to bottom (last filter/action applied).
Drag and drop the filters to change the order in which they are applied. Changes are highlighted in yellow and a message appears indicating that the configuration options must be saved for the changes to take effect.

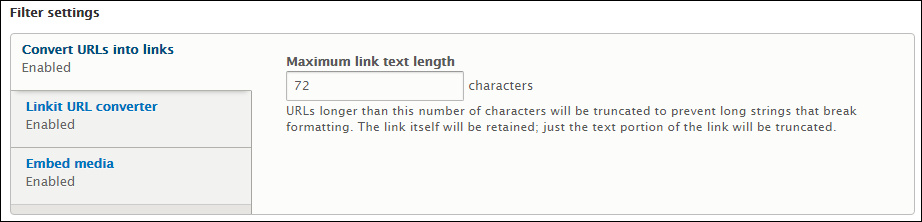
Filter Settings
This area holds the specific settings for each filter/action selected in the Enabled Filters area. Clicking on the name of the filter/action in the list reveals the fields for its specific settings.
Save Configuration button
This button saves any changes made on the editor configuration screen. Always click this button after making any changes to the configuration.